Are DIY saunas feasible to build at home? is a question that may be on your mind. In northern countries such as Finland, about 50% of people own a sauna at home. Although less popular in other regions of the world, many people would consider an indoor sauna to be a luxury. If the idea of adding a sauna to your typical-sized house or flat seems expensive, reconsider—any Finnish resident will tell you that it’s simpler than you may imagine.
Even 10 to 15 minutes in a classic wood-burning sauna can improve your heart and mental health by increasing blood circulation and releasing endorphins. Instead of overloading you with data on these wellness areas, we’ll guide you through the process of building a DIY sauna outdoors so you can begin enjoying the benefits quickly.
Table of Contents
Is building a sauna beneficial?

It is dependent upon multiple things. Building a customized home sauna has several benefits: you can customize every aspect to your liking, be it adding LED lights, choosing a certain kind of wood, or creating a special design. However, the procedure can be more difficult and costly than buying a prepared sauna.
DIY sauna kits are a fantastic choice if you want a personalized sauna that ideally matches your space and enjoy creating a sauna with family and friends. However, if you would prefer to avoid the inconvenience of building, a prefabricated sauna that needs to be assembled would be a better option.
How to use a sauna?
It’s critical to understand how to use a sauna efficiently if you’ve decided to choose this lifestyle and are prepared to build one. Take note of these suggestions to get the most out of your sauna’s health benefits:
To start with, make sure everyone showers before entering the sauna to keep it clean. You can sit in the sauna naked, but make sure to always put a towel between your skin and the wooden bench. This is also a great chance to give your sauna an attractive update. Sauna sessions usually last 10 to 15 minutes of heating up and then cooling off with a cold water plunge or a chilly shower.
Another fun activity is to add more heat by tossing water over the heated embers; a bowl and spoon are needed for this. These come with modern aluminum finishes or matching wood. Speak with a skilled contractor for additional in-depth information about using saunas.
Dry saunas are essential for a DIY project
Dry saunas are a popular option because of their ease of use and flexibility when designing a DIY sauna project. The North American Sauna Society (NASS) lists six primary categories of saunas, the primary distinction being their heat sources.
The plumbing-free nature of traditional Finnish wood-burning stoves or electric heaters allows for greater location flexibility. Both indoors and outdoors, dry saunas may be constructed practically wherever and fit into small areas. Beginners only need to frame the ceiling and walls because prepared packages or DIY sauna kits give all the inside materials. Here you can purchase the best Portable Wood Burning Stove with Chimney Pipes & Gloves.
How to Build a Home Sauna
I’ve wanted to build my sauna ever since I bought my first house a few years ago. I’ve seen saunas in homes, residences outside, spas, and health clubs. At temperatures between 140°F and 200°F, these compact, heated rooms are ideal for reducing stress, encouraging rest, and fostering overall well-being. Taking a sauna bath or laying in the snow after getting heated up is a practice that may be quite refreshing.
1. Choose Your Location
Since a dry sauna doesn’t need water, it can be placed anywhere there is plumbing. If you’re thinking about installing an outdoor sauna, make sure it’s close to your main building. Because it does require a nearby power source for electricity. It’s best to hire an electrician for this portion of the setup and keep in mind that saunas often need 220V power.
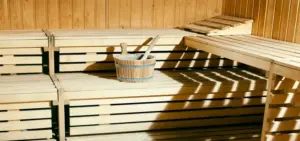
A minimum floor area of 4 by 4 feet is required for a tiny sauna, in addition to additional space for the door and wiring, and a minimum ceiling height of 7 feet. Verify that the surface is level. Allow around two feet of bench space per person to figure out the size. If you want to experience something truly Finnish, think about taking a shower nearby to wash off.
2. Get Your Supplies Ready
When building a sauna, choosing the appropriate wood is essential. Despite its high cost, cedar is the best option because of its resistance to moisture, strength, and effective insulation. Poplar, basswood, and Canadian hemlock are further choices. Though less resistant to decay and possibly smelling when new, hemlock is an affordable option.
Select a floor covering that works well for you, such as tile, wood, or concrete, and make sure you have enough insulation, especially in the ceiling. Fiberglass insulation and an aluminum vapor barrier are advised by the National Association of Sauna Manufacturers (NASS).
Include an air input on the heater wall close to the floor and a plug on the opposite wall, under the top bench, as part of your airflow plan. Before framing the walls and roof, pour the cement foundation. Never be afraid to ask a builder for assistance if you need it.
3. Select Interior Paints
Use wood that enhances both the sauna’s appearance and use for the interior paneling. While Nordic whitewoods are customary in Finland, cedar is well-known for its lovely scent and hardiness. If money is tight, use high-quality wood for the walls and benches and less expensive wood for the other parts, such as pine or spruce.
4. Choose a Heat Source

Choose between using an electric heater or a wood burner. In general, electric heaters are less costly and require less upkeep than wood-burning stoves, but they are frequently perceived as being less genuine. A classic sauna experience can be had with wood-burning heaters, but they need wood and constant upkeep, which can raise homeowner’s insurance costs. Based on your preferences for ease and reliability, choose your choice.
5. Think About Visual Changes
Both practicality and visual appeal are important for saunas. Installing windows with double-paned glass might help preserve insulation if your backyard sauna has a view. Wood, glass, or sliding door options are available. If you choose an electric heater, the way it looks will also affect how the sauna looks as a whole, so choose one that suits your style.
Is it cheaper to build your sauna?
In general, not. Let’s analyze the costs to see why it might be more expensive than a constructed DIY sauna and if there are any ways to reduce the cost.
Wood: The price of wood for the walls and roof of a DIY sauna ranges from $3 to $35 per square foot, with redwood being the most expensive and pine being the least. The cost of wood grows with the size of your sauna.
Flooring: Plywood, cedar duckboard, sauna towels, and cement are typical materials. The price range for a square foot is $1 to $10. Whereas cement is strong yet usually coated in a veneer of wood for visual appeal, plywood can expand with humidity and may need to be sealed or replaced. A lovely balance between affordability and durability can be found in cedar duckboard.
Door: Choosing a wood or glass door can have an impact on the door’s functionality as well as beauty. Glass doors are more open and light-filled, but they also require tempered glass, which can be more expensive, for safety and insulation. Although simpler, wooden doors might not let in as much light.
Benches: The size and type of wood used for the benches will determine their cost. Benches for one person typically cost about $100, while larger, elaborate benches might cost up to $800 or more. Here you can Buy the best Sauna Bench with Storage.
Heater: The kind of heater you select will affect the final price. Although they usually cost less, wood-burning heaters need a chimney and may have more initial wood expenditures. Although they are reasonably priced and efficient, infrared heaters provide a unique kind of heating. Gas heaters are often used for larger spas and may be more cost-effective in some locations, while electric heaters are more commonly used and efficient.
Here you can purchase the best Sauna Heater, 9KW 220V Electric Sauna Stove.
There are several prices and factors to consider while building a DIY sauna. Get an estimate for your dream setup with our sauna builder form if you’re confused between a prefab sauna and a do-it-yourself project.
What kind of sauna wood is used?
Softwood is usually used for DIY saunas because it retains its warmth and is comfortable to the touch. Redwood, hemlock, spruce, pine, and cedar are popular options. Hardwood may be employed in particular situations because it contains less resin, which is an advantage for resin that is sensitive. Hardwood, however, heats up more quickly, which could result in burns from extended exposure.
Is a vapor barrier necessary in a sauna?
Saunas are meant to be dry spaces, so a vapor barrier is usually not required. The purpose of the steam produced by adding water to sauna rocks is to add moisture, not to create a steam room. However, adding a vapor barrier might be helpful if you enjoy a steam room-like experience.
Does a sauna require a floor drain?
Complex drainage systems are typically not needed for residential saunas. Water sprayed over sauna rocks evaporates most of their moisture fast, avoiding floor accumulation. Often, all you need for cleaning is a damp cloth and some light soap. Installing a few drainage holes can help manage extra water if you use a water supply or are worried about pool water.
What is the ideal thickness for sauna walls?
The thickness of a sauna wall varies depending on whether it is indoor or outdoor. In most cases, 2 to 3 inches of total wood and insulation thickness is sufficient for indoor saunas. Because of the higher temperature changes, particularly during the winter, outdoor sauna walls need to be 4 to 5 inches thick. About 45″ W x 45″ D for a 2-person sauna, 72″ W x 72″ D for a 4-person sauna, and 120″ W x 120″ D for an 8-person sauna are the recommended sizes.
Conclusion
In conclusion, building a DIY sauna can be a fulfilling activity that improves your daily routine for wellness. You may make your house a tranquil haven by following these 5 crucial steps: organizing your design, choosing the right supplies, making sure there is enough insulation and ventilation, putting the structure together, and setting up the heating system. Your DIY sauna can enhance your general health and well-being for many years to come, in addition to offering a relaxing retreat with great care to detail and safety.


